Configuring e-mail alerts in the Scheduler
One of the frequently used scheduled tasks is sending e-mail notifications.
| To configure e-mail alerts about other scheduled tasks, you must first make sure that all the mail server settings are set properly in the Alerts section on the Server settings tab in the Administrative Tool. Contact your administrator for more information. |
Open the Scheduler. To proceed with alert configuration:
-
Select the task in the hierarchy which you wish to be notified about (and/or notify other users) via e-mail.
-
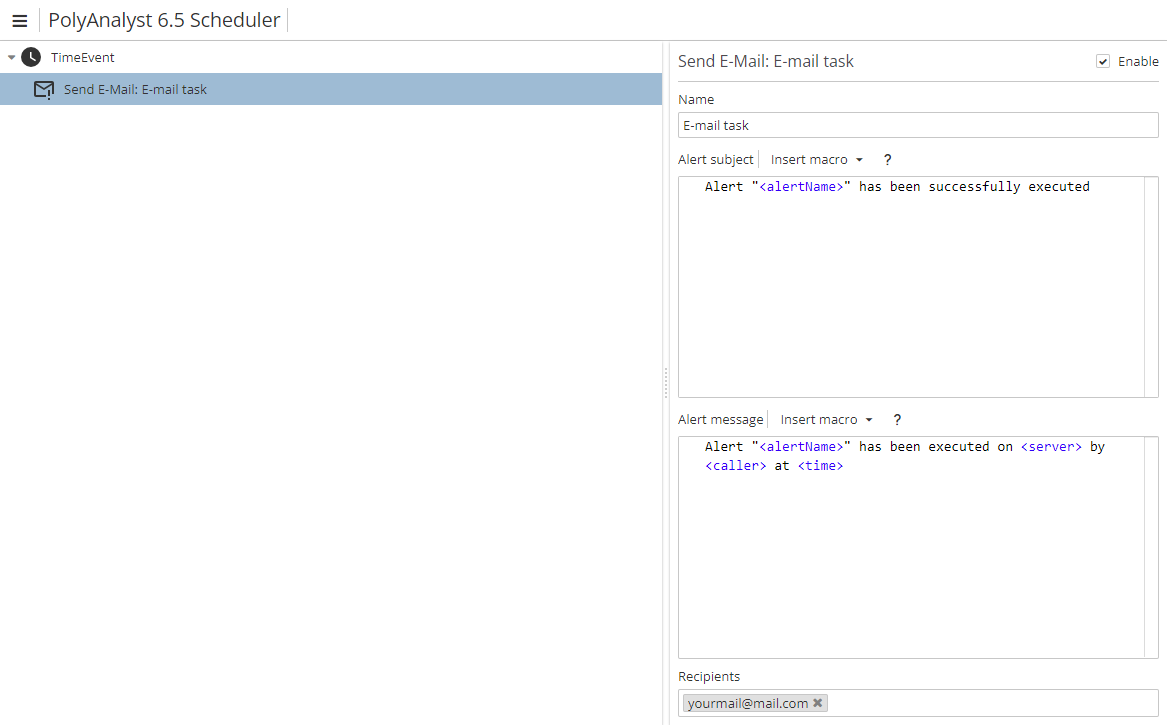
Select Add e-mail notification in the Add task menu. A new task will appear in the tree. On the right there will be a window to configure the alert.
-
Configure the subject and the message of the alert. By default, the text fields contain messages with macros (
<alertName>,<server>,<caller>and<time>).Among other areas where macros are used in PolyAnalyst, they are also available in the Scheduler. In particular, they can be used while configuring scheduled e-mail alerts. They are ready-made blocks which can be inserted into the subject line or the message text of e-mail alerts at the configuration stage.
The Alert subject line contains one example of a macro, i.e.
<alertName>. Three other macros (<server>,<caller>and<time>) are embedded into the alert message by default.If the default message is not edited, the recipients of the alert will get a message, e.g. "Alert "E-mail task" has been executed on 10.0.0.28 by administrator at 9/15/2016 1:06:45 PM".
To edit the subject and message, place the cursor into the corresponding field. After you have done so, the Insert macro button will become active. Click the button to open the list of available macros:
-
Server name (
<server>) – inserts server name (IP-address); -
Project ID (
<projectId>) – inserts project ID; -
Project name (
<projectName>) – inserts project name; -
Execution time (
<time>) – inserts execution time; -
Alert name (
<alertName>) – inserts alert name; -
Trigger (
<trigger>) – inserts a trigger (if only one node was selected for a Trigger-type task); -
Node name (
<objName>) – inserts node name (if only one node was selected for a Trigger-type task); -
Node type (
<objType>) – inserts node type (if only one node was selected for a Trigger-type task); -
Caller (
<caller>) – inserts caller, i.e. the user who initiated the task; -
File (
<file>) – inserts a file, i.e. a file to be sent with the message (e.g. one can use the<file("@user@\some_file.png")>syntax, where@user@is an alias for your PolyAnalyst Drive home folder andsome_file.pngis a file example).You can only select one macro at a time. In case you want to use several macros in the alert, you will have to open the Insert macro menu several times.
-
-
Enter one or more e-mail addresses in the Recipients list. There is no real maximum number of emails (although there is a noticeable server performance decrease once the list contains several thousand). PolyAnalyst does not verify whether the addresses are correct.
You might wish to check if the e-mail alert has been properly configured and the task will be correctly executed later. Right-click on the event or task and select the Test (immediate execution) option. See the Configuring PolyAnalyst Scheduler section for more information.