Logging into PolyAnalyst
PolyAnalyst requires that you log in to PolyAnalyst Server once you choose to open a client.
-
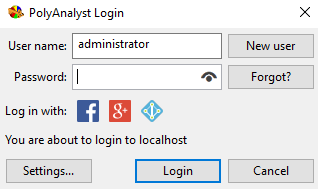
The Login window appears once you have selected to open a client from the Start menu:
-
Depending on how PolyAnalyst was installed and configured, it may perform a check for a new version when opening the login window. You may see a prompt asking if you wish to upgrade to a newer version of PolyAnalyst. If you see the prompt, you can cancel the upgrade and continue to log in. See the Upgrading PolyAnalyst guide for additional information.
-
Enter your username and password. Passwords are case sensitive. Depending on server settings, PolyAnalyst can remember the name of the last user to log in, or both his name and his password, or none.
-
Click Login.
-
If this is your first time establishing a connection to PolyAnalyst after having installed it, and if you are using the default account (username "administrator" and no password), PolyAnalyst prompts you to set a password for the default administrator account.
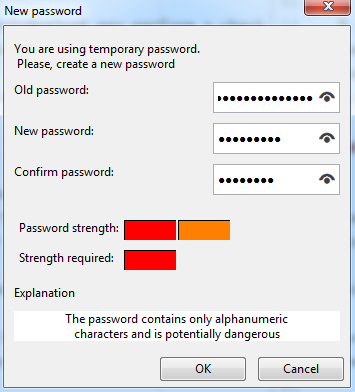
Leave the field Old password blank, as you are setting the password for the first time. Enter a new password in the New password field. Enter the new password again in the Confirm password field. When editing the value for the New password or Confirm password fields, make sure you delete any existing characters in the fields before entering your own. Make sure to use a password you can remember, and consider recording this password somewhere that complies with your company’s security policy. Pay attention to the security feedback provided below the fields. PolyAnalyst may be setup to use a strict password security policy. Additional details on configuring the security policy are described in the Administrative Tool guide. You may or may not need to meet the requirements set forth by the policy, and you may still be able to continue with setting the new password despite receiving a message at the bottom stating that the password fails to meet a certain requirement. When you have finished entering in a password, click OK. PolyAnalyst sets the new password for the administrator user profile.
-
PolyAnalyst connects to the server, verifies the user name and password, and then opens the client.
If you encounter a problem, make sure that CapsLock is disabled. In addition, see the topic on troubleshooting the login process. In addition, check with your administrator on how PolyAnalyst was installed, and verify that the server is also installed on your computer and that the server is currently running. If no administrative user at your organization is able to login, see the troubleshooting topic on resetting all passwords.
Advanced login help
Depending on how PolyAnalyst has been setup, you may need to click the Settings button in the Login window and configure other options. For example, you may need to connect to a server on another computer, or connect to a server using LDAP. Check with your IT staff regarding how PolyAnalyst is installed in order to determine whether you need to configure additional settings. If you installed PolyAnalyst yourself on your own computer, you will probably not need to configure any additional settings.
Logging into PolyAnalyst using OAuth 2.0 protocol
For users to be able to log in to PolyAnalyst with the help of their Facebook, Microsoft Azure AD or Google user credentials, this type of authentication must be enabled in the server settings. Contact a PolyAnalyst administrator for more information.
Logging into PolyAnalyst with Google account
You can log in with your Google credentials using Google Cloud Platform:
-
Create the project in Google Cloud Platform. The dashboard of the project will open.
-
Proceed to the Getting started section:
-
select the Explore and enable APIs. The APIs & Services page will open;
-
press the Enable APIs and services button;
-
enable Google People API.
-
-
Go back to the APIs & Services page and select the OAuth consent screen section:
-
fill in the mandatory fields;
-
in the Scopes section, add
/auth/userinfo.emailin Your non-sensitive scopes.
-
-
Go back to the APIs & Services page and select the Credentials section:
-
select OAuth client ID;
-
specify the type as
Web application; -
specify the name and fill in the Authorized JavaScript origins or Authorized redirect URIs;
-
press Create.
-
-
Go back to the APIs & Services page and select the Credentials section:
-
select OAuth client ID;
-
specify the type as
Desktop app; -
specify the name;
-
press Create.
-
You also need to specify some configurations in the PolyAnalyst Administrative Tool:
-
Open the Server settings in the Administrative Tool.
-
Select the OAuth Google Account settings section and fill in the corresponding fields.
-
Select the Optional field and create the field with the following settings:
-
Field unique name -
emailAddresses[0]value; -
Field display name -
userinfo.email -
Group -
emailAddresses; -
Visible - enable (tick);
-
Required - enable (tick);
-
leave other settings empty.
-
-
Press Save changes.
Few words on Authorized JavaScript origins and Authorized redirect URIs fields
In the Authorized JavaScript origins field, enter the origin for your app. Multiple origins are also available as there may be different protocols, domains, etc. used in your application to make JavaScript calls to services exposed by Google via API. The use of wildcards or subpath is not allowed.
| Origin is a unique value containing a protocol, hostname and port. |
Example values for the fields are given below:
https://00.megaputer.net (for Authorized JavaScript origins)
https://00.megaputer.net/polyanalyst/oauth/google (for Authorized redirect URIs)
| In this case the "Authorized redirect URIs" may be left empty if the Authorized JavaScript origins field is defined. |